


GitHub Actions is a great feature added to the GitHub platform. It allows an easy way to create CI/CD for our project. In this blog post, I'm going to show you how easy it is to start using GitHub Actions. I will create a simple Angular application and CI/CD which each time we will push new code to our repository it will execute the following commands:
- Checkout code from the repository
- Cache node modules
- Install dependencies
- Run linter
- Run SonarCloud scan
- Run unit tests
- Run e2e test
- Build project
- Deploy to Github Pages (if it’s a master branch)
- Run lighthouse audit for a deployed project (only for master branch)
Create app
In this blog post I'm focused on creating CI/CD for our application, but not on the application itself. I created a very simple Angular application which is displaying our company name: 'Architech'. I will not describe the process of creating this example application. If anyone is interested, a clean application (without CI/CD code) is available here.
Create workflow
Workflow is a custom automated process that allows performing some tasks on code in the repository, eg. build, test or deploy. There is no limit on how many workflows could be created in one repository. All workflows are stored inside the ‘. github/workflows’ directory of the project and a single workflow is a file with any name and ‘. yaml’ or ‘. yml’ extension.
Let’s create our first workflow. Under ‘. github/workflows’ directory create file ‘main.yml’ and then copy and paste the following code:
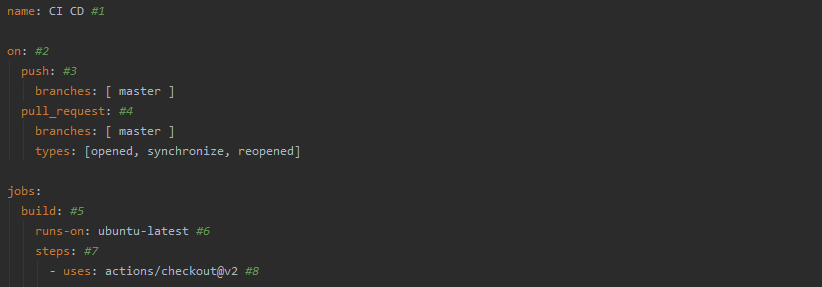
- The name of the workflow, it's displayed in the repository actions page and it helps distinguish workflows between each other. Our example workflow has a name set to 'CI CD'
- An attribute that defines when the workflow should be executed. It allows providing a single event name, an array of events, an array of event types, cron job definition, and even a combination of all of them. For all options see documentation.
- Our example will trigger workflow execution on each push to the ‘master’ branch.
- The workflow will be executed for each pull request which was created to ‘master’ branch and was ‘opened’, ‘synchronized’, or ‘reopened’.
- Each workflow should contain one or more jobs. All jobs in workflow by default are executed in parallel, but there is an option to make it run sequentially.
- Required attribute for each job. It defines on which operating system our workflow will be executed. In our example, we are using the latest version of ubuntu. A list of all possible operating systems is available here.
- Each job consists of a list of tasks called steps that are executed sequentially.
- Steps can run commands, run setup tasks, or run an action. In our example, we are using action ‘actions/checkout@v2’, which is an action provided by GitHub and is responsible for fetching code from our Github repository. Action is a small portable building block of tasks that could be used in multiple workflows. You can create your own actions, or use one's created by other users. You can find more actions on GitHub Marketplace.
That’s it. We created our first workflow. Right now it's very simple and is only fetching code from our repository, but later we will extend it to perform more actions. Here you can find the workflow created so far.
Lint, test, e2e and build:
It’s time to add more useful things to our workflow. Each time our workflow will be executed it should install npm dependencies, run lint, test, e2e, and build our application using production config. It could be achieved by writing a few simple commands:
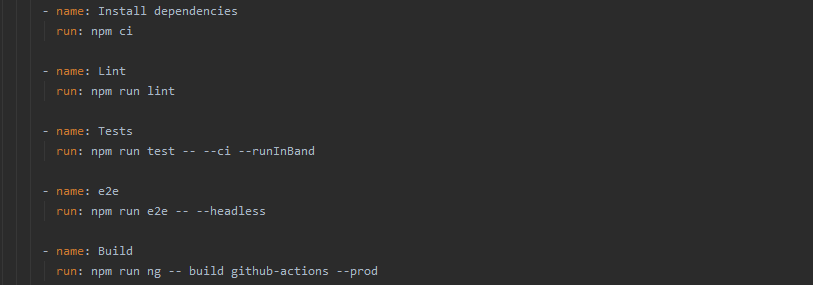
Here you can find workflow created so far.
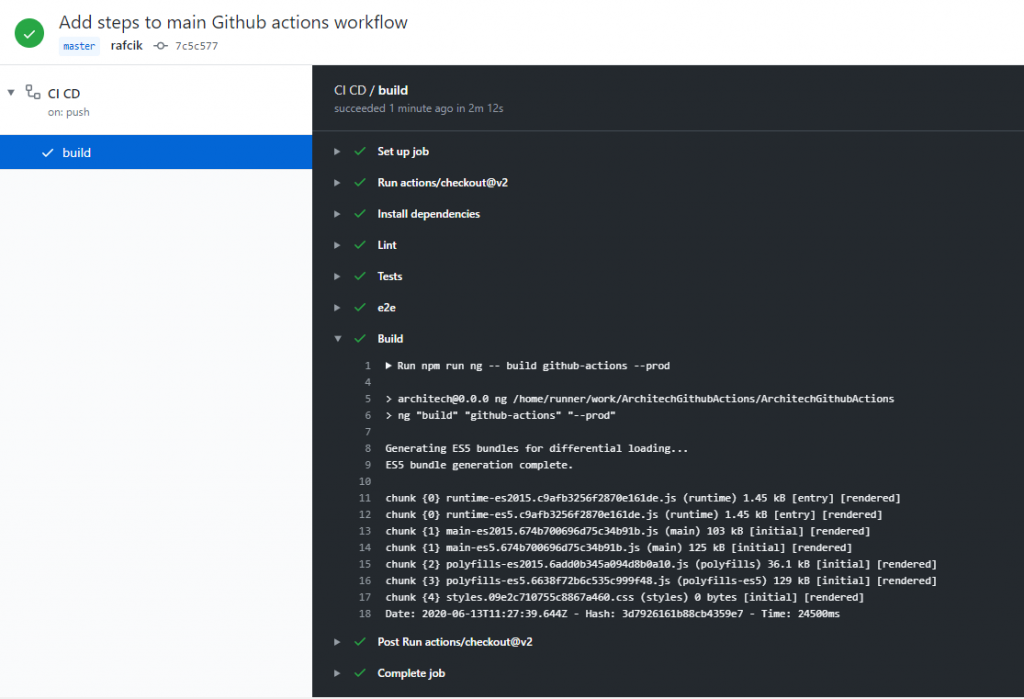
After commit and push, your workflow should start executing. If everything was done properly, you should see that all steps completed successfully:
Cache node modules:
Each time our workflow is executed it is installing all npm dependencies we are using in our application. All JavaScript developers know that often node_modules directory is very heavy. Its size is relatively small at the beginning of work, but it’s size quickly grows along with the development of our application.

(Image by devRANT via devRANT)
If the application we are building is depending on a lot of packages, it could drastically slow down our CI/CD because each time our workflow will be executed, it will have to download all packages from the repository. We could speed up this process by caching node_modules directory. Fortunately, there is already an action build by GitHub which is simplifying this process:
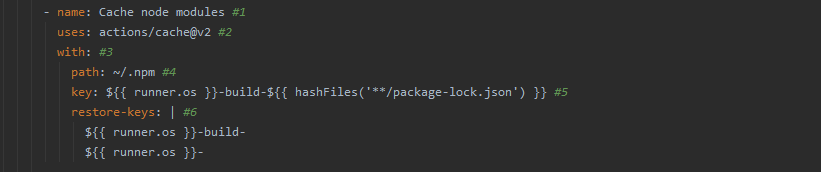
- The name of the step helps to identify that step inside the action summary view on GitHub.
- It’s a selector of action that should be executed during this step. An action is a reusable unit of code and can be created by anyone. We could use actions that are stored in the same repository as the workflow, a public repository, or in a published Docker container image. In this case, we are using action ‘actions/cache’ which is created by the GitHub team (see https://github.com/actions/cache). It is recommended to specify the version of the action we want to use to not break our workflow in case if there was a new version released (we are using version 2 of ‘actions/cache’ action).
- Each action can have several parameters as input. We can specify those parameters by defining them inside ‘with’ property.
- The first parameter we are passing to action is 'path'. This param is required and defines which directory should be cached. Npm cache files are stored in ‘. npm’ the directory inside a home folder on Linux and macOS systems.
- The second required parameter is ‘key’. It defines a pattern for a key that will be used for saving and searching for the cache. Usually, when we are running our workflow on multiple environments we don’t want to mix cache files between them. Eg. when we are running the workflow on Linux we don’t want to pull cache which was created for windows. That’s why we are encoding the name of the os at the beginning of our key. We also are encoding the hash of the ‘package-lock.json’ at the end of our key. When anything will be changed in our dependencies new cache key will be created and cache files will be stored in a new place.
- ‘actions/cache’ action allows us to pass a third (optional) parameter ‘restore-keys’. In case if there won’t be any cache created yet for ‘key’ specified in point 5, our action will search for cache files for keys which are matching those ones specified in ‘restore-keys’ property. It is useful for scenarios when we are modifying the list of our dependencies (eg. we are adding a new one). In that case, there won’t be any cache files for newly generated cache key (because of changes inside 'package-lock.json' file), so the action will fetch cache file for any key matching this one defined in ‘restore-keys’ and our workflow won’t have to download all dependencies again - it will only download missing packages.
Here you can find workflow created so far.
Sonar Cloud Scan:
We want to keep the quality of our code at a high level. A good way to do that is to scan our repository using Sonar Cloud.
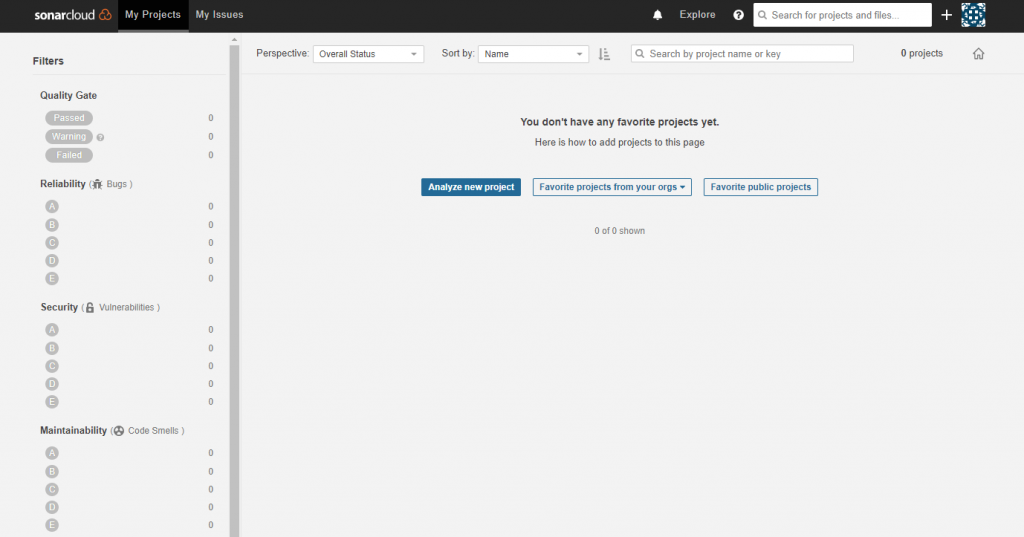
First, we have to prepare 'Sonar Cloud' project where all results will be collected and where we will have easy access to them. Go to page https://sonarcloud.io/ if you don’t have created an account yet, create one, and then create/join an organization. The next step is to add a new project. It can be done by clicking “Analyze new project” on “My Projects” page.
On the new page, you should choose the option “create manually” - we want to run analyze inside our Github Action workflow and only send results to Sonar cloud. On the next page, you should specify the Project key and Display name and then hit “Set Up”. For my project, it will be “ArchitechGithubActions”. Now we have to generate Sonar token, which will be used by our workflow to send results to Sonar cloud. It can be done by going to “My Account” page and then to “Security”. To generate token, provide a friendly name and click “generate”. Now it’s time to add generated token to GitHub project. Go to your project on GitHub, then select “Settings” and then “Secrets” page. To add new secret hit “New secret” button and on the new page, specify secret name eg. SONAR_TOKEN, and as a value paste token generated in the previous step. If everything went successfully, the newly added token should be visible inside “Secrets” page:

Now it’s time to write some code. First, we have to add a sonar configuration file to our project. Create “sonar-project.properties” file in the root directory of your project and paste the following code:

You should replace the values of “organization” and “projectKey” to match those ones from your project. Now you should modify your workflow code and add step which will run Sonar analysis and upload results to Sonar cloud.

- We are using “SonarSource/sonarcloud-github-action” action which will run sonar analysis and upload results to the cloud.
- “SonarSource/sonarcloud-github-action” requires “SONAR_TOKEN” environment variable set to communicate with Sonar Cloud.
- The second env variable is which needs SonarCloud action is GITHUB_TOKEN. GITHUB_TOKEN is automatically generated for our workflow by GitHub, so you don’t have to generate it manually.
That’s it, commit and push your changes and when workflow execution will finish, your results will be available to see in the Sonar Cloud:
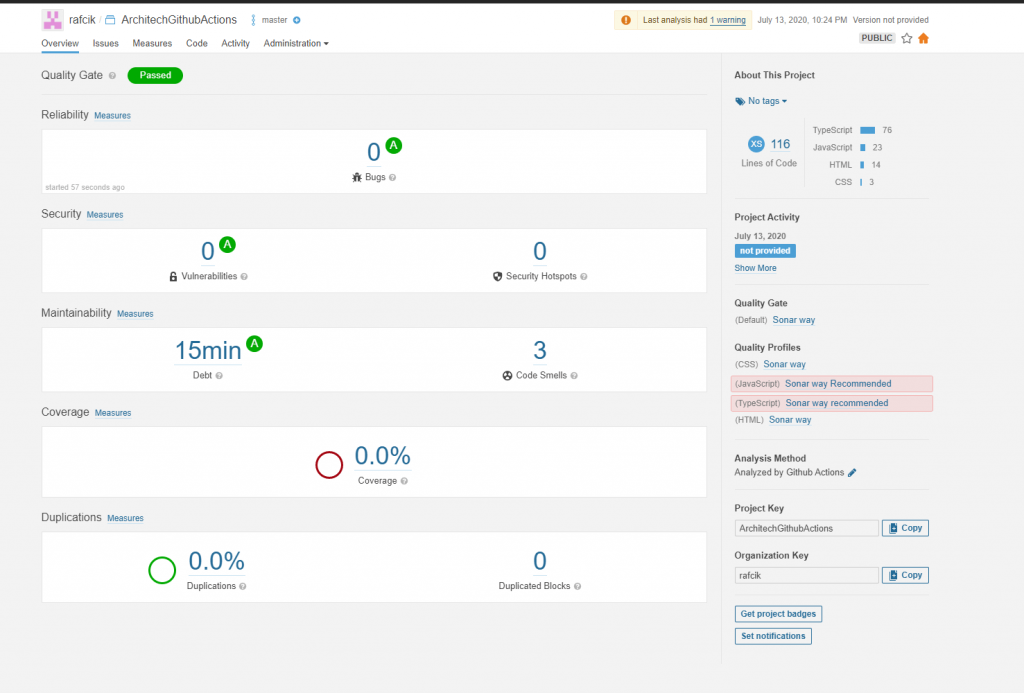
Here you can find changes created in this step.
Deploy an application to Github Pages:
When the build of our application was properly executed, all test is green, then it’s time to deploy to production. We want to deploy our app as often as possible, to accelerate the feedback loop with our customers and eliminate pressure from developers by not having “Release day” anymore. This methodology is called “Continuous deployment”. We will be deploying our app each time anything will be merged into the master branch and will pass all tests.
We want to deploy our app to GitHub Pages, Angular already has command ‘ng deploy’ which is able to deploy our app in a simple way. All we have to do is, install a proper package for deploying an app to GitHub Pages and then write the next step in our GitHub actions workflow.
The first step is to install ‘angular-cli-ghpages’ package:

The second step is to modify our build step in the workflow file. We have to add 'base-href' property, which will be equal to our repository name:

The third and last step is to add a step in our workflow file:

- We want to execute deploy step only for ‘master’ branch. This step should be skipped for all feature branches.
- The command will deploy app to GitHub Pages. Our app was already built in the previous step, so we are using ‘--no-build’ option. We also have to provide options: ‘name’ and ‘email’, because ‘angular-cli-ghpages’ will be performing commit to branch ‘gh-pages’ from which app will be served.
- ‘ng deploy’ command will be performing commit to branch ‘gh-pages’ so we have to provide ‘GITHUB_TOKEN’ to fulfill necessary permissions for adding new commit in our repository.
Now it’s time to commit and push our changes. When a whole workflow will be executed properly, you should see your site deployed at the following address:
https://{{username}}.github.io/{{repositoryName}}/ - in my case it will be: https://rafcik.github.io/ArchitechGithubActions/
Here you can find changes created in this step.
Run lighthouse audit for deployed project:
The last thing we want to implement is to run the lighthouse score audit to measure the performance of our app for each deployment. There is already built action that will do it for us. Its name is: 'treosh/lighthouse-ci-action' and all we have to do is to add the next step in our app.
But this time it will be done in a little bit different way. I want to show various possibilities that GitHub Actions offer. We will create a separate job, which will be executed only for the master branch and also will wait for the deployment of the page. All we have to do is to add a few lines to the main workflow file:
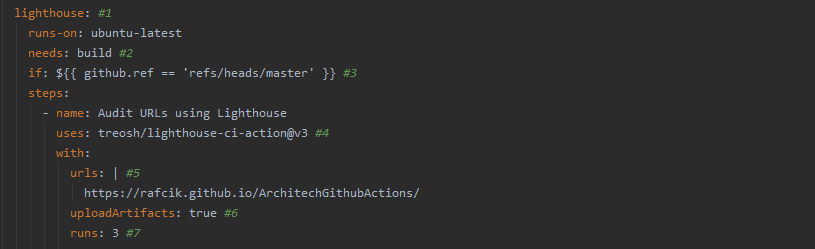
- Our new job will have a name: ‘lighthouse’
- We want to run this job after deployment of the page which is executed in the first (‘build’) job. Our second job will wait with execution until the ‘build’ job has been successfully executed.
- Our deployment step is executed only for ‘master’ branch. We want to run our audit only when the deployment was executed, to we have to add a condition to execute a whole job only for ‘master’ branch.
- To perform a lighthouse audit, we will use the already created action 'treosh/lighthouse-ci-action'. It allows us to run an audit for a deployed application, upload audit artifacts to GitHub Actions, run tests several times, and a few more features we are not using right now.
- We can specify as many pages/subpages as we want. Action will perform an audit for all URLs specified here.
- This option enables uploading artifacts to GitHub Actions. Artifacts with audit results will be available to see after the action is finished.
- This option defines how many times an audit should be executed.
That’s it when our workflow will successfully end, we should be able to find HTML files with audit results in GitHub Action artifacts:

Here you can find changes created in this step.
Conclusion
That’s all. With only a few simple steps we created CI/CD for our application. GitHub Actions is a great replacement for other tools like Jenkins or TravisCI. It’s free for public repositories. For private repositories, you are receiving a certain amount of free minutes and storage to use, which should be enough for projects developed by a single person or small team.
Useful links:
- Example repository:https://github.com/rafcik/ArchitechGithubActions
- Deployed application:https://rafcik.github.io/ArchitechGithubActions/
- Last action execution: https://github.com/rafcik/ArchitechGithubActions/actions/runs/184724936
- GitHub Actions documentation: https://docs.github.com/en/actions